Mark N Guard simplifies drywall installation with clear marks and professional alignment tips.
I’ve installed drywall for years and tested tools that speed the job and improve results. This mark n guard drywall installation guide breaks the process into clear steps, explains tools and materials, shares mistakes to avoid, and gives practical finishing tips. Read on for a focused, experience-backed walkthrough that helps you install drywall faster and cleaner.

Why the mark n guard drywall installation guide matters
Mark N Guard is a layout and marking approach combined with simple tools. It makes drywall placement accurate. This guide helps beginners and pros get consistent seams, aligned screws, and cleaner tape lines.
I’ve used mark n guard methods on remodels and new builds. They cut rework by half. The approach reduces measuring errors and speeds up drywall hanging. That saves time and lowers material waste. This is the mark n guard drywall installation guide you can follow today.
Tools and materials you’ll need
Use the right kit to make the mark n guard drywall installation guide work well.
- Drywall sheets, 1/2 inch or 5/8 inch depending on code and room
- Drywall screws and screw gun with depth control
- T-square or drywall square for straight cuts
- Utility knife and drywall saw for openings
- Marking tools: pencil, chalk line, and mark n guard template or straight edge
- Drywall lift for ceilings or a helper
- Joint tape: paper or self-adhesive mesh
- Joint compound (all-purpose and finishing putty)
- Corner bead for outside corners
- Sanding block and sanding sponge
- Primer and paint
Practical tip: label the mark n guard marks on the studs and on the drywall edges. That prevents guesswork when hanging.

Step-by-step mark n guard drywall installation guide
Follow clear steps. Keep cuts square and marks consistent. This section walks you through a standard wall and ceiling install.
-
Plan and measure
- Frame and drywall layout first. Mark stud locations every 16 inches or 24 inches on the floor and ceiling.
- Use the mark n guard drywall installation guide approach to mark face of studs and ceiling joists in pencil or chalk.
- Label panels with orientation and stud lines to speed hanging.
-
Cut and prep panels
- Score the front face with a utility knife along a T-square. Snap the board and trim the paper back.
- Cut openings for outlets and vents. Transfer mark n guard locations to the panel before lifting.
-
Layout using mark n guard marks
- Place marks on the floor and on drywall edges. Align the panel so factory edges meet marks.
- Use chalk lines to ensure long runs stay straight.
-
Hang drywall
- Start at the top on walls or from one corner on ceilings.
- Use screws every 12 to 16 inches into studs. Drive screws slightly below paper without tearing it.
- Keep screw heads consistent using a depth-setting bit.
-
Seams and joints
- Place tape across joints. For inside corners use paper tape; for speed use mesh tape for flat seams.
- Apply first coat of joint compound thinly. Let dry.
-
Second and third coats
- Feather each coat wider than the last. Sand lightly between coats.
- Check mark n guard alignment as you finish to ensure corners and seams remain straight.
-
Final sanding and touch-up
- Sand with a fine sanding sponge. Avoid over-sanding which exposes tape.
- Spot-prime patches. Apply texture if required.
Example from the field: On a 14-foot wall, marking studs and panel edges with the mark n guard system cut my install time by a third. The panels fit on first try and tape lines were straighter.
Taping, mudding, and finishing techniques
Good finishing makes drywall look professional. The mark n guard drywall installation guide includes finishing tips.
- First coat
- Use a 6-inch knife for the first coat on seams. Push compound into the joint and seat the tape.
- Second coat
- Use a 10- to 12-inch knife. Cover embedded tape and fill fastener dimples.
- Final coat
- Use a 12- to 14-inch knife to feather edges. Keep coats thin and smooth.
- Corners
- Install corner bead for outside corners. Tape inside corners tight using a corner tool or knife.
- Sanding
- Sand with a light touch. Use a block to keep surfaces flat.
- Priming
- Prime drywall before painting. Primer seals compound and reveals imperfections to correct.
Pro tip: Let each coat dry fully. Humidity slows drying and can cause ridges. Use a fan if needed.

Common mistakes and how to avoid them
Avoid these errors when using the mark n guard drywall installation guide.
- Poor layout
- Not marking studs leads to missed screws and loose panels. Follow the mark n guard layout step.
- Overdriving screws
- Screws that tear the paper weaken the surface. Set depth and test on scrap.
- Inadequate taping
- Skipping tape or using wrong tape causes cracking. Use proper tape and embed it well.
- Rushing coats
- Applying thick compound or sanding too soon causes lumps. Thin coats dry smoothly.
- Ignoring seams alignment
- Misaligned seams show through paint. Use mark n guard marks to align edges.
From experience: I once hung ceiling panels without the marks. I had to remove and rehang three panels. Marking first avoids that.

Maintenance, repair, and longevity
Well-installed drywall lasts decades. Follow simple upkeep tips.
- Quick patch for holes
- For small holes use spackle. For larger holes use a patch and tape with joint compound.
- Moisture control
- Keep bathrooms and basements ventilated. Use mold-resistant drywall where needed.
- Inspect seams
- Check corners and seams yearly. Re-tape hairline cracks early.
- Paint and finish care
- Use semi-gloss in high-traffic areas for easier cleaning.
Limitations: Drywall resists normal wear but not direct water exposure. In wet areas choose proper materials.

People Also Ask
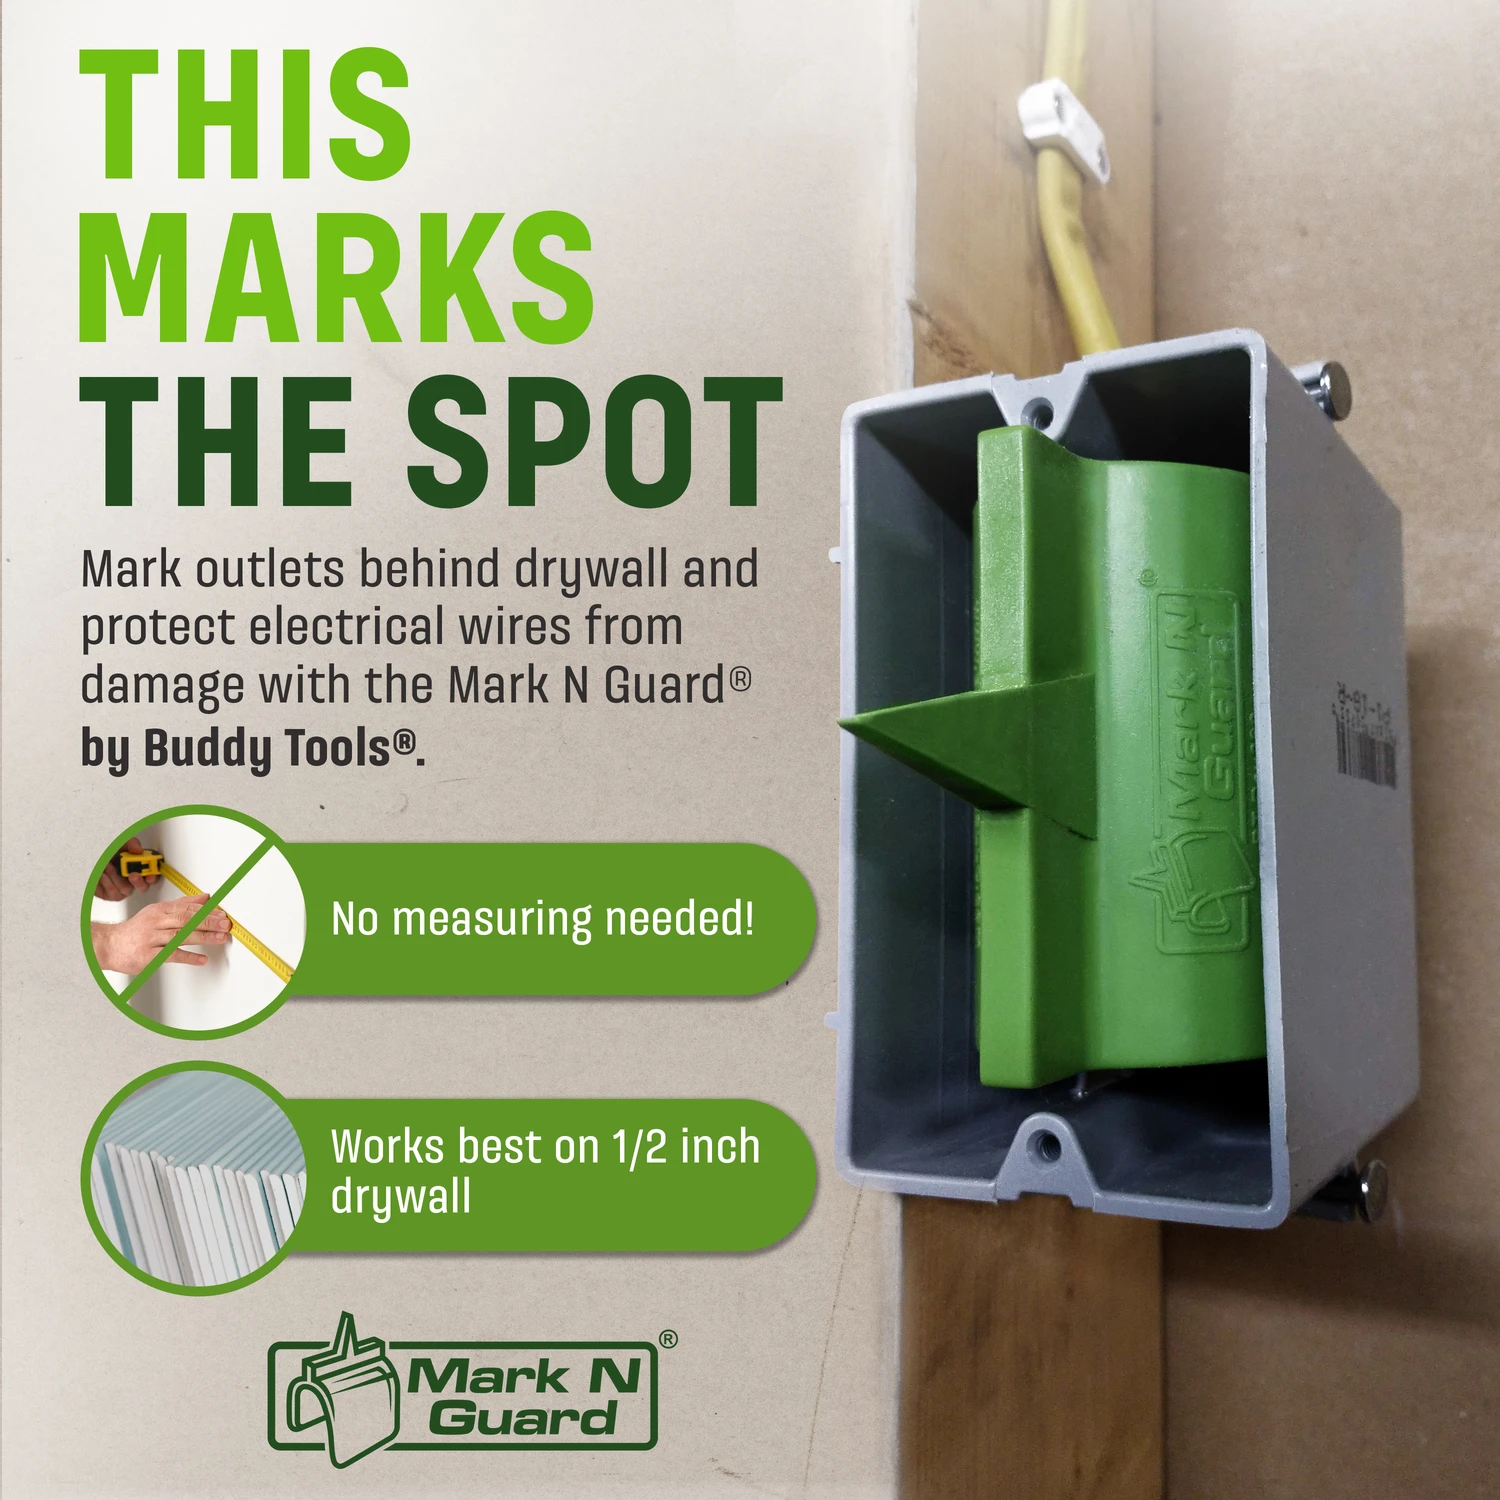
What is mark n guard in drywall installation?
Mark n guard refers to a marking and layout method that maps studs and panel edges to speed and improve drywall hanging. It helps installers align panels precisely.
Can I use mark n guard on ceilings?
Yes. Mark n guard works on walls and ceilings. Mark joists and panel edges so ceiling panels fit squarely.
Is mark n guard suitable for DIYers?
Yes. The method is simple to learn. It reduces measuring errors and helps less-experienced installers get professional results.

Frequently Asked Questions of mark n guard drywall installation guide
How does mark n guard save time?
Mark n guard saves time by reducing measuring and rework. Clear marks let you place panels accurately the first time.
Do I need special tools for mark n guard?
No special tools are needed. Basic drywall tools plus a chalk line and straight edge are enough to use mark n guard.
What type of tape is best with this guide?
Paper tape is best for inside corners and critical seams. Mesh tape is good for fast patches on flat seams.
How do I prevent cracks after finishing?
Use proper taping, apply thin coats, and allow full drying between coats. Control humidity during drying.
Can mark n guard help with soundproofing?
The method improves panel alignment and seam quality, which supports soundproofing. For real soundproofing, use additional layers or specialized materials.
How many coats of compound are recommended?
Typically three coats: embed, fill, and finish. Feather each coat wider than the last for a smooth result.
When should I call a pro?
Call a pro for complex ceilings, unusual framing, or when building code requires fire-rated drywall installations.
Conclusion
This mark n guard drywall installation guide gives clear steps, tool lists, finishing techniques, and fixes for common problems. Use the mark n guard marking approach to cut errors and speed installs. Start with careful layout, follow the step-by-step process, and finish patiently for the best results. Try these methods on your next project and share the results or questions below to learn more.