Essential vinyl siding removal tool guide for safe, fast, and clean siding removal.
I’ve spent years helping homeowners and contractors remove siding. This vinyl siding removal tool guide breaks down the right tools, why they matter, and how to use them safely. Read on for step-by-step tips, tool picks I trust, and compact checklists you can use on the job.

Why the right tools matter for vinyl siding removal
Using the proper tools speeds the job and protects the wall underneath. This vinyl siding removal tool guide shows which tools reduce damage and lower labor time. The right kit also keeps you safe and helps you work with confidence. I learned this on my first siding project when the wrong pry bar crushed many panels. That mistake taught me to pick tools with the right balance and edge shape.

Core tools in a vinyl siding removal tool guide
Below are the must-have tools for most jobs. Each tool has a clear role. I include practical tips from real projects.
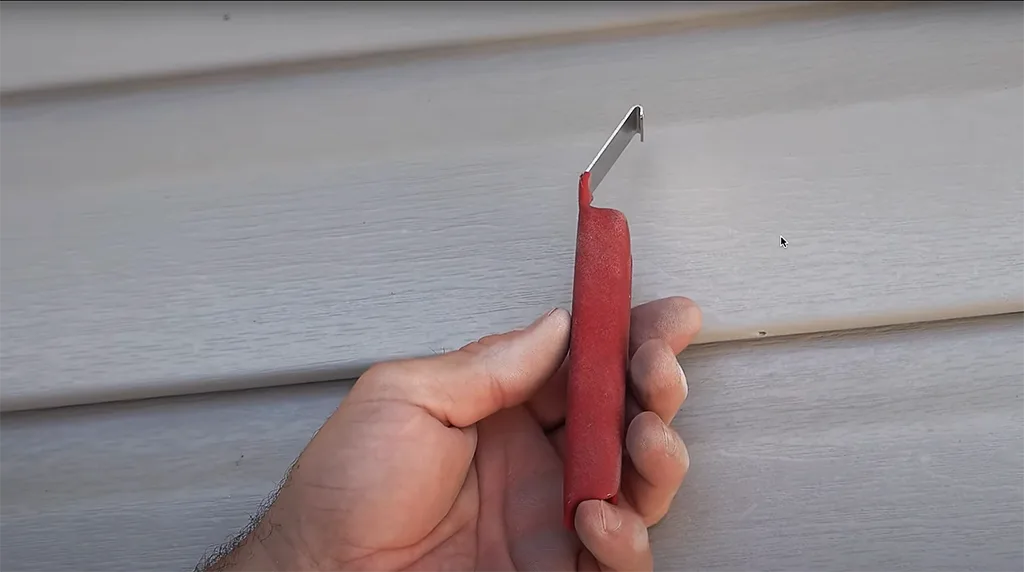
- Zip tool (siding remover) — Unlocks panels without breaking them. I always carry two because one dulls fast.
- Crowbar or pry bar — Removes nails and loose trim. Choose a thin, stiff bar for tight spaces.
- Utility knife with fresh blades — Cuts caulk, trim, and underlayment. Replace blades often to avoid nicking sheathing.
- Hammer and nail puller — Removes stubborn nails and fasteners cleanly.
- Cordless drill with screwdriver bits — Speeds removal of screws and trim. Keep spare batteries charged.
- Oscillating multi-tool with metal blade — Cuts flashing or nailed trim without tearing panels.
- Ladder or scaffolding — Provides safe access. Use platform scaffolding for long walls.
- Work gloves and eye protection — Protect hands from sharp edges and flying debris.
- Trash bags and bins — Keep the jobsite tidy and make recycling easier.
Safety gear and best practices in the vinyl siding removal tool guide
Safety prevents injuries and stops small problems from becoming big ones. Treat safety as part of the tool kit.
- Hard hat — Protects from falling objects on scaffolding.
- Safety glasses — Essential during prying and cutting.
- Gloves with grip — Protect hands and improve control.
- Dust mask — Use if old siding is dusty or if there’s possible contamination.
- Stable ladders and fall protection — Always secure ladders and use harnesses on higher work.
- Work slowly near corners and trim — This reduces the chance of breaking panels.

Choosing tools by siding condition and type
Not all vinyl siding removal jobs are the same. This vinyl siding removal tool guide helps you match tools to the task.
- Well-installed, intact panels — Use a zip tool and gentle pry bars for clean removal.
- Brittle or aged vinyl — Use thin, sharp tools and go slow to avoid cracking.
- Panels nailed to sheathing or furring strips — Expect more pry and nail work; bring heavy-duty pry bars and nail pullers.
- Hand-cut around windows and corners — Use an oscillating multi-tool for precise cuts without damaging trim.

Step-by-step removal process using this vinyl siding removal tool guide
Follow these steps for safe, efficient removal. I include small tips from my fieldwork to help you avoid common issues.
- Inspect and plan
- Walk the wall and note fasteners, trim, and problem spots.
- Take photos to guide reinstallation.
- Start at a top corner or joint
- Use the zip tool to unlock the top edge of the first panel.
- Work a few inches at a time to avoid warping panels.
- Work horizontally across the wall
- Slide the zip tool under the nailing hem and lift gently.
- Use a pry bar only where the zip tool cannot reach.
- Remove trim and accessories
- Unscrew or pry away corner posts, J-channels, and trim.
- Label or stack pieces for reuse.
- Deal with stubborn nails and screws
- Use a nail puller or pry bar for nails near studs.
- Use the drill for screws; keep bits nearby for quick swaps.
- Clean and inspect sheathing
- Remove old nails and check for rot or damage.
- Make repairs before installing new siding.
I once removed a full side of siding for a repair. Labeling trim saved hours when we reinstalled matching pieces.

Tool maintenance and care tips from experience
A well-cared tool lasts longer and performs better. These short tips come from years on job sites.
- Clean tools after each use to remove vinyl dust and caulk.
- Sharpen zip tools and blades regularly for safer cuts.
- Oil pivot points on pry bars and nail pullers to keep them smooth.
- Store tools dry and off the ground to prevent rust.
- Replace worn utility blades before they slip and damage material.

Common mistakes and troubleshooting in the vinyl siding removal tool guide
Avoid these pitfalls to save time and money.
- Rushing the job — Leads to broken panels and extra cost.
- Using the wrong pry edge — Can dent or crack siding.
- Not labeling trim — Causes confusion during reassembly.
- Ignoring hidden fasteners — May snap panels when pulled.
- Forgetting to check for rot — Repairs become harder if delayed.
Quick fix tips
- If a panel cracks, keep pieces to match color for patching.
- If nails strip, use an oscillating tool to cut through the fastener and remove the remainder.

Cost, time estimates, and when to hire a pro
Simple removals can be weekend projects. Bigger jobs may need pro help. This vinyl siding removal tool guide gives realistic expectations.
- Small wall or single side — 2 to 8 hours for one person with the right tools.
- Full house removal — Several days and a team for larger homes.
- Tool costs — Basic kit costs under a few hundred dollars; specialty tools add more.
- When to hire a pro — If you lack ladders, scaffolding, or if sheathing is damaged, hire a pro to reduce risk.
:max_bytes(150000):strip_icc()/tool_use_detail-56a4a1fb5f9b58b7d0d7e94a.jpg)
PAA-style questions readers ask about vinyl siding removal tool guide
These short Q&A entries address common search intent.
What is the best tool to remove vinyl siding quickly?
The zip tool is the best basic tool for quick removal of interlocked panels. It unlocks panels with minimal damage.
Can I remove vinyl siding without damaging the sheathing?
Yes, with the right tools and slow technique you can usually avoid sheathing damage. Check for hidden nails and work from top down.
How long does it take to remove vinyl siding from one side of a house?
A small team can remove one side in a day for a medium house; a single person may take longer. Time depends on condition and access.
Do I need special blades for cutting vinyl siding?
An oscillating tool with a fine-tooth metal blade works best for precise cuts. Utility knives work for thin trim and caulk lines.
When should I call a professional for siding removal?
Call a pro if there is suspected rot, mold, or if the job requires scaffolding and high-risk work. Professionals also manage disposal and repair work.
Frequently Asked Questions of vinyl siding removal tool guide
How do I use a zip tool to remove vinyl siding?
Slide the zip tool under the nailing hem and pull down and out to disengage the lock. Work along the seam in small sections to avoid breaking the panel.
Is it safe to remove vinyl siding alone?
You can remove small sections alone, but larger jobs are safer with a helper. A partner stabilizes ladders and assists with heavy panels.
Can I reuse vinyl siding after removal?
Yes, many panels can be reused if not cracked or warped. Label and stack panels carefully to keep them in order.
What causes vinyl siding to crack during removal?
Using blunt tools, prying at the wrong angle, or removing brittle, aged vinyl can cause cracks. Use thin, sharp tools and work gently.
How should I dispose of old vinyl siding?
Recycle where possible or follow local waste rules for construction debris. Bundle panels and remove nails for safer handling.
Conclusion
This vinyl siding removal tool guide gives the tools, steps, and safety tips you need to remove siding with care. Use the right tools, follow a clear plan, and take your time to protect the home and yourself. Try a small test section first, then scale up with confidence. Share your experience, ask questions below, or subscribe for more hands-on home project guides.