A wall mount tool storage rack setup organizes tools on the wall to save space and speed up work.
I’ve installed and refined many wall mount tool storage rack setup systems in my own garage and at client shops. This guide covers why a wall mount tool storage rack setup works, how to plan one, what parts and tools you need, and step-by-step installation tips. Read on for practical advice, common mistakes, and simple upgrades that make your shop neater and your projects faster.

Why choose a wall mount tool storage rack setup?
A wall mount tool storage rack setup frees floor space and keeps tools visible. It reduces time spent digging through boxes. It also protects tools from moisture when mounted off the floor.
Benefits at a glance:
- Saves floor space for work or storage.
- Makes tools easy to find and return.
- Reduces damage and clutter.
- Can be customized for tool type and shop size.
My experience: switching to a wall mount tool storage rack setup cut my tool search time by half. I could lay out projects faster and feel less stressed in the shop.

Types and components of wall mount tool storage rack setup
There are simple racks and full modular systems. Choose one that fits your tools, wall type, and budget.
Common types:
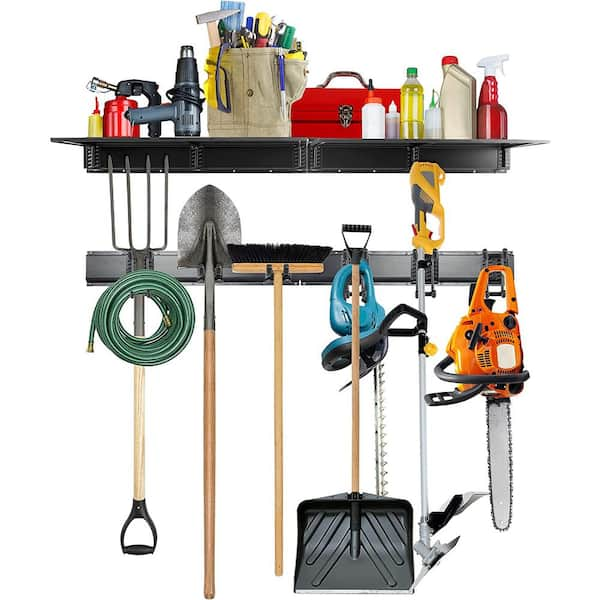
- Pegboard systems with hooks for hanging hand tools.
- Slatwall and slot panels for adjustable brackets.
- Metal rail and hook racks for heavy tools.
- Custom wooden racks for long handles and specialty tools.
Key components:
- Mounting panel or rails.
- Hooks, brackets, and holders.
- Fasteners sized for your wall and load.
- Optional bins and magnetic strips.
Choosing the right type depends on tool weight, frequency of use, and whether you will rearrange often. A mixed system often works best: pegboard for small tools and rails for heavy gear.
Planning and measuring for your wall mount tool storage rack setup
Measure your wall space first. Note studs, outlets, and lights. Mark work zones for drills, saws, and hand tools.
Steps to plan:
- List the tools you want on the wall by size and weight.
- Measure width, height, and clearances for handles.
- Locate wall studs with a detector and map them.
- Decide on zones: daily tools near the bench and seasonal tools higher up.
PAA-style questions:
How much space do I need for a basic wall mount tool storage rack setup?
Allocate at least 24 to 36 inches of horizontal space for a small bench area. Larger tool arrays need wider runs or multiple walls.
Can I mount a wall mount tool storage rack setup on drywall?
Yes, but anchor to studs for heavy tools. Use rated anchors for medium loads and avoid hanging heavy items only on drywall.
Good planning stops surprises during install and keeps the setup safe and tidy.

Materials and tools needed for a durable wall mount tool storage rack setup
Gather materials before you start. Using correct hardware prevents sag and failure.
Basic materials:
- Pegboard, slatwall, or metal rail panels.
- Wood or metal cleats if needed for extra support.
- Lag bolts or structural anchors for studs.
- Hooks, brackets, and tool holders suited to your tool shapes.
Essential tools:
- Stud finder and level.
- Drill and correct bit set.
- Socket set or impact driver.
- Tape measure and pencil.
Tip from experience: pick high-quality hooks and brackets. Cheap hooks bend and make the system look messy fast.

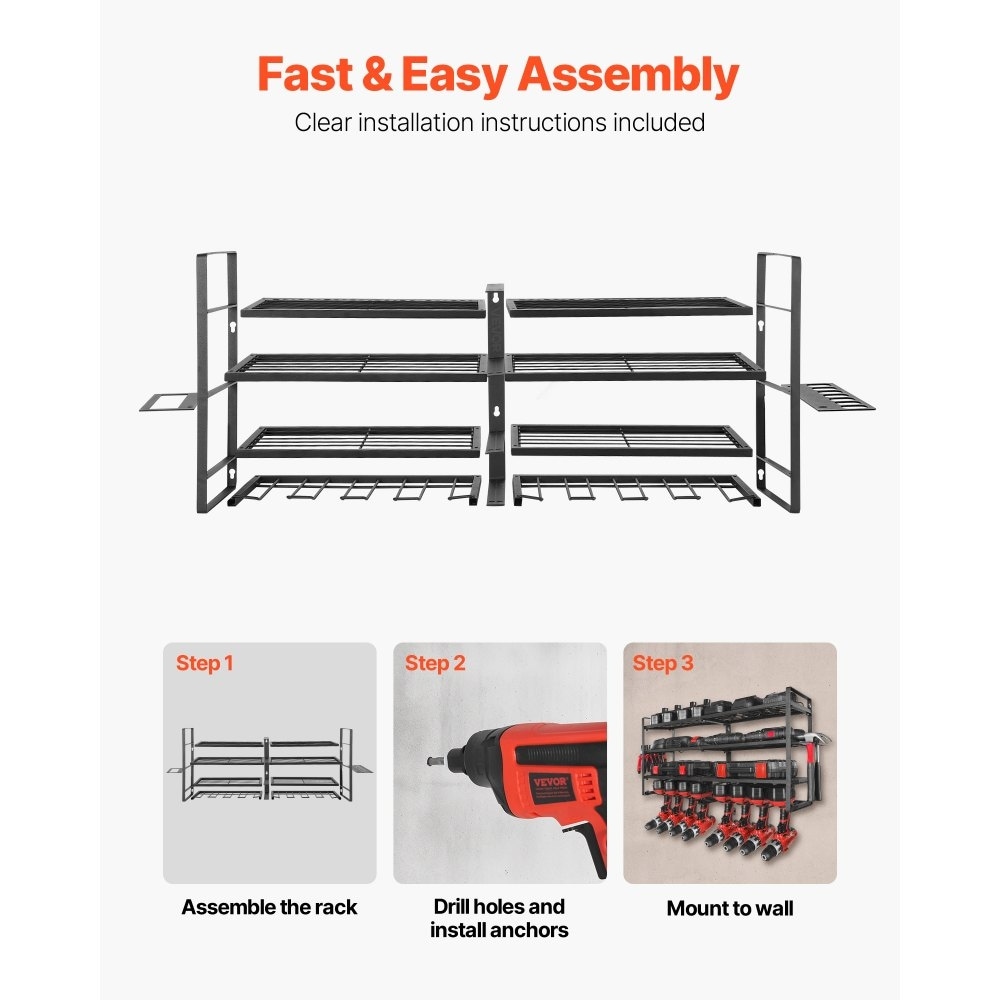
Step-by-step installation of wall mount tool storage rack setup
Follow a clear order. Work slow. Check level frequently.
Installation steps:
- Mark stud locations and map the layout with pencil.
- Cut panels to fit, if needed. Test fit on the wall.
- Pre-drill holes in panel aligning with studs.
- Fasten panel to studs with lag bolts. Use washers for wood.
- Install rails or hooks per manufacturer spacing.
- Add tool holders and customize the layout.
- Load tools in trial runs and adjust spacing.
Safety checks:
- Pull test a few anchors before hanging heavy tools.
- Keep heavy items lower on the wall for stability.
- Leave clearance for doors and work surfaces.
From my installs: attach a thin wood cleat behind a metal panel when studs are uneven. It makes the panel sit flat and gives more thread engagement for bolts.

Safety, maintenance, and care for wall mount tool storage rack setup
A well-made wall mount tool storage rack setup is safe when inspected often.
Maintenance tips:
- Inspect fasteners every 6 months.
- Swap out bent hooks immediately.
- Clean metal parts to prevent rust.
- Rebalance weight if one area starts to sag.
Safety practices:
- Keep heavy items at waist height or lower.
- Use locks or safety latches for sharp tools.
- Label zones so others return tools correctly.
Be honest about limits. If a tool feels too heavy, move it to a floor cabinet or use multiple anchors.

Common mistakes and troubleshooting with wall mount tool storage rack setup
Avoid these common errors to save time and frustration.
Common mistakes:
- Relying only on drywall anchors for heavy tools.
- Crowding too many tools into a tight area.
- Not measuring clearances for tool handles.
- Using mismatched hardware that weakens the mount.
Troubleshooting quick fixes:
- If a panel pulls away, add a cleat or extra lag bolts.
- If hooks bend, upgrade to thicker steel or double hooks.
- If tools fall, reassess spacing and install safety clips.
My lesson: take time to lay tools out on the floor first. It shows real space needs and prevents crowded racks.

Cost, space optimization, and upgrade tips for wall mount tool storage rack setup
Costs vary by material and size. Plan for growth and upgrades.
Budget guide:
- Basic pegboard and hooks: low cost.
- Slatwall panels and quality brackets: mid cost.
- Custom metal systems and heavy-duty rails: higher cost.
Space optimization:
- Use vertical height and keep floor clear.
- Store long tools vertically with cradles.
- Group by task to speed workflow.
Upgrade ideas:
- Add labeled bins for small parts.
- Install a magnetic strip for bits and blades.
- Fit LED strip lights above the rack for better visibility.
I recommend investing a bit more in anchors and brackets than in panels. Good hardware holds up for years and pays off.
Frequently Asked Questions of wall mount tool storage rack setup
How do I choose between pegboard and slatwall for a wall mount tool storage rack setup?
Pegboard is affordable and easy to cut. Slatwall offers stronger support and more modular brackets for heavy items. Choose by tool weight and how often you will reconfigure.
What fasteners work best for a heavy wall mount tool storage rack setup?
Lag bolts into studs are the best for heavy loads. Use structural anchors only when studs are not available and follow their load ratings.
Can I install a wall mount tool storage rack setup in a garage with concrete walls?
Yes. Use concrete anchors or sleeve anchors sized to the load. Pre-drill with a masonry bit and follow anchor torque specs.
How high should I mount a wall mount tool storage rack setup?
Keep frequently used tools between waist and eye level. Store seldom-used or seasonal tools higher up, but within safe reach using a step stool.
How do I prevent tools from falling off a wall mount tool storage rack setup?
Use proper hooks and safety clips for small or heavy items. Group similar tools and avoid overloading individual hooks.
Conclusion
A smart wall mount tool storage rack setup saves space, speeds work, and protects your tools. Start small, plan with measurements, and use quality fasteners and hooks. Test your layout on the floor, anchor into studs, and keep heavy tools low. Take one wall today, mount your first set of tools, and see how much smoother your projects run. Share your setup, ask questions, or subscribe for more shop tips.