A clear, practical waterproof wire connector installation guide for safe outdoor electrical splices.
I’ve installed and tested dozens of outdoor splices, so this waterproof wire connector installation guide will walk you through the right parts, tools, and steps. I’ll explain types of connectors, show step-by-step installation, share troubleshooting tips, and offer real-world lessons I learned on jobs and home projects. Read on to get confident, neat, and safe waterproof connections for outdoor, marine, and underground wiring.
Why use a waterproof wire connector installation guide?
Water damages electrical splices fast. A good waterproof wire connector installation guide helps you pick the right connector and do the job right. Following steps cuts the chance of corrosion, shorts, and failures in wet conditions. This guide keeps safety and reliability front and center while showing simple, repeatable techniques.
Types of waterproof wire connectors
Knowing connector types helps you choose the right one for the job. This section reviews the most common options and when to use each.
Heat-shrink butt connectors
These are tubular connectors with glue-lined heat-shrink. You crimp the wire, then heat to shrink and seal the joint. They work well for wires in harsh outdoor or marine spots.
Gel-filled or resin-filled connectors
These use a gel or resin that surrounds the splice. They resist moisture and vibration. They are great for long-lasting splices in buried or exposed locations.
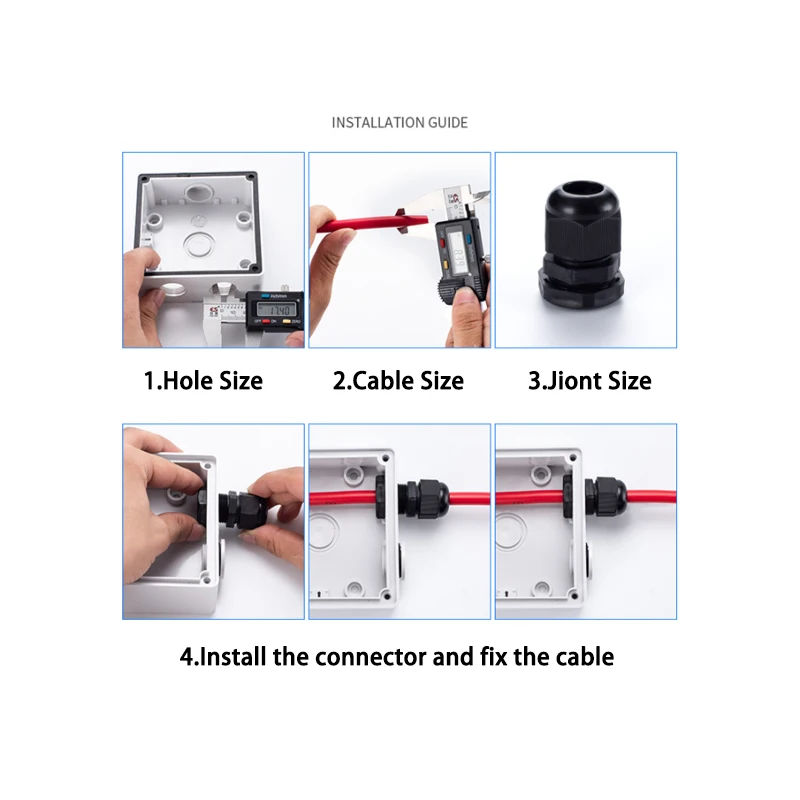
Screw-tight waterproof connectors
These are small housings with a rubber gasket and screw terminals inside. They let you join wires without crimping. They are handy for field repairs and larger cable runs.
Pre-molded silicone or rubber boots
These boots slide over a splice and seal with clamps or adhesive. They are ideal for splices that may need future access or replacement.
This waterproof wire connector installation guide covers when to use each type and how to ensure a true seal. Pick the right style for wire gauge, environment, and load.
Tools and materials needed
Gather these before you start. Good prep makes the job fast and reliable.
- Wire strippers: size matched to your wire gauge.
- Crimping tool: ratchet crimpers for consistent crimps.
- Heat gun or torch: for heat-shrink connectors.
- Multimeter: to test continuity and voltage.
- Waterproof connectors: chosen per the section above.
- Dielectric grease or sealing resin: for extra moisture protection.
- Heat-shrink tubing (optional): for added protection.
- Electrical tape (PVC-free for outdoor use) and zip ties.
- Safety gear: gloves and eye protection.
This waterproof wire connector installation guide assumes you have the right tools. Using wrong tools increases failure risk.

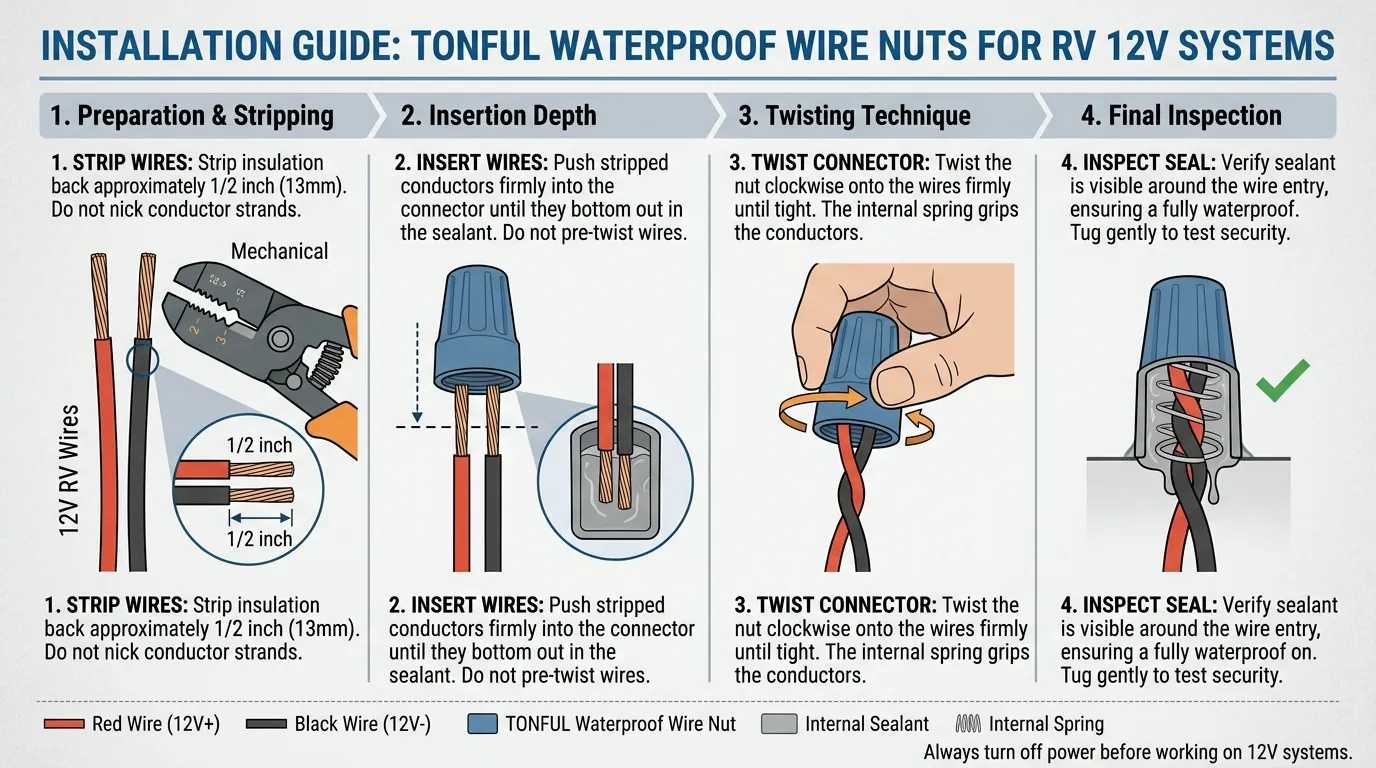
Step-by-step waterproof wire connector installation guide
Follow these clear steps for a reliable outdoor splice. Keep each step simple and steady.
- Turn off power and verify
- Cut power at the breaker or disconnect.
- Use a multimeter to confirm zero voltage on wires.
- Prep the wires
- Cut wires cleanly with a sharp cutter.
- Strip the correct length of insulation per connector instructions.
- Twist stranded wire neatly to prevent stray strands.
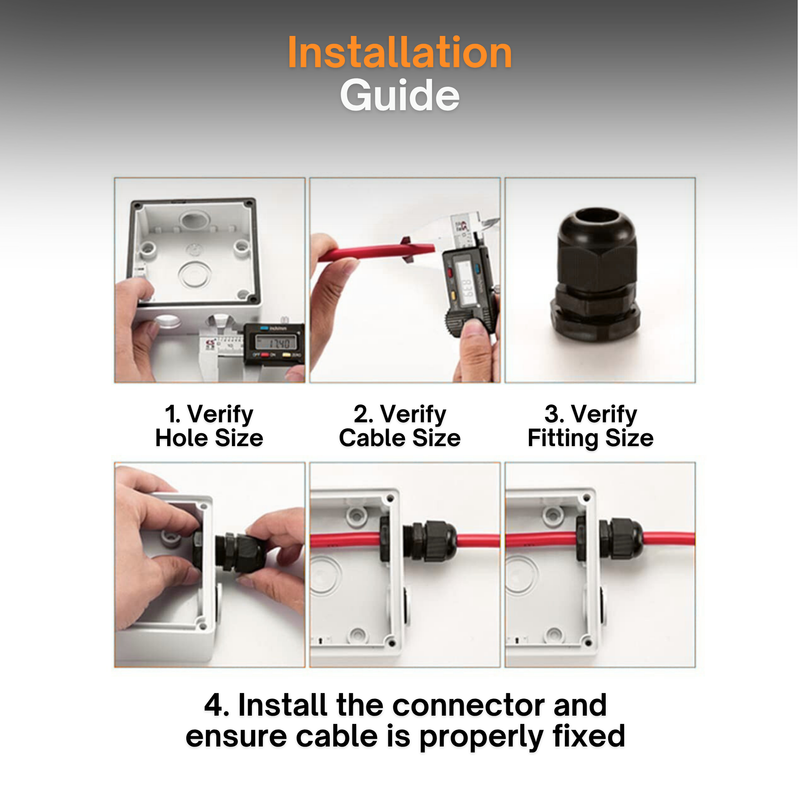
- Choose the right connector
- Match connector size to wire gauge.
- Pick heat-shrink, gel-filled, or screw-tight based on environment.
- Make a mechanical connection
- For crimp connectors, insert wire fully and crimp with a ratchet crimper.
- For screw or push-in types, tighten to the torque recommended by the maker.
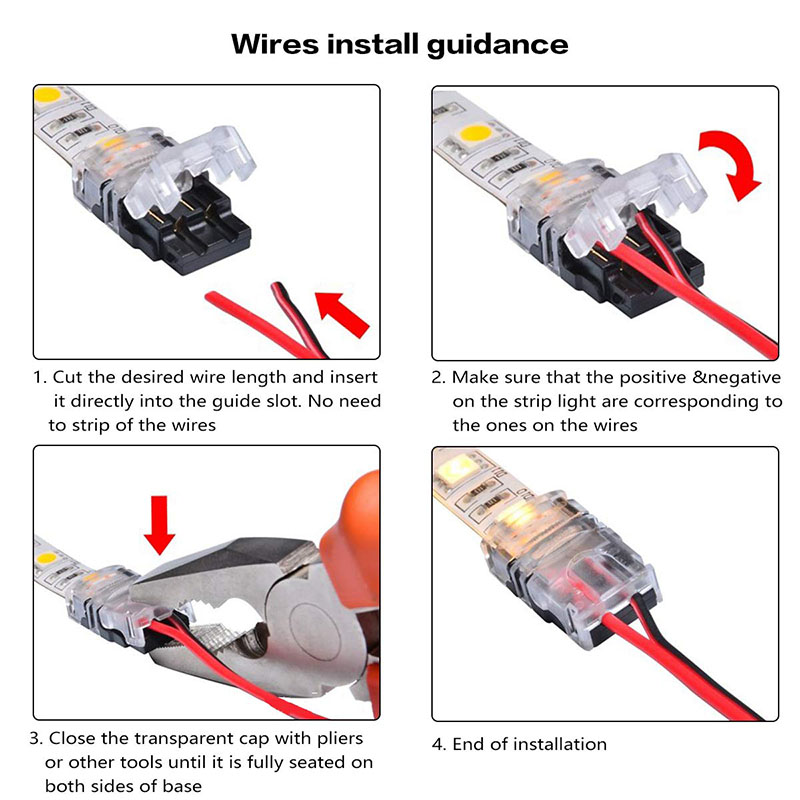
- Seal the joint
- For heat-shrink connectors, apply heat evenly until the glue flows and the sleeve shrinks snugly.
- For gel or resin connectors, ensure the gel fully surrounds the splice.
- For boots, apply adhesive or clamps per instructions.
- Add secondary protection
- Slide additional heat-shrink or tubing over the sealed area for mechanical protection.
- Apply dielectric grease to prevent corrosion where appropriate.
- Test the connection
- Check continuity and polarity with a multimeter.
- Power the circuit and test under load if safe to do so.
- Final routing and strain relief
- Secure cables with zip ties or clamps.
- Avoid sharp bends and protect from abrasion.
This waterproof wire connector installation guide aims to keep steps clear and repeatable. Each step lowers leak risk and extends service life.

Testing, verification, and troubleshooting
Good testing catches issues before they cause damage. This section shows quick checks and fixes.
-
Continuity test
- Use a multimeter to verify the splice conducts as expected. No continuity means a poor connection.
-
Load test
- Power the circuit briefly and monitor for heat at the splice. Excess heat signals a bad crimp or undersized connector.
-
Visual inspection
- Look for gaps, melted insulation, or exposed strands. A visual check finds obvious failures.
-
Leak test
- For outdoor installs, spray a bit of water and re-check continuity. If water affects the connector, reseal with heat-shrink or sealant.
PAA-style question 1: Will heat-shrink fully waterproof a splice?
- Heat-shrink with adhesive seals well when heated properly. Use adhesive-lined tubing or a combined connector for true waterproofing.
PAA-style question 2: Can I use silicone gel over a bad crimp?
- Silicone can seal moisture but cannot fix a poor mechanical connection. Re-crimp the splice before sealing.
PAA-style question 3: How do I test a buried splice?
- Use a multimeter on both ends and check for resistance changes. If possible, test under load and inspect after a water spray.
This waterproof wire connector installation guide includes routine tests to catch issues early.

Best practices and safety
Follow these habits to keep work safe and reliable. Small steps prevent big failures.
- Always cut power before working on wires.
- Use the correct crimp tool for the connector type.
- Match connector rating to wire gauge and current load.
- Protect splices from UV, abrasion, and chemicals.
- Leave splices accessible when possible for future inspection.
- Document repairs with date and connector type for future reference.
I learned to slow down and double-check crimps. A single extra check has saved failed runs and returned client trust.
Common mistakes and lessons from the field
I’ve fixed many bad outdoor splices. These are the common errors and how to avoid them.
-
Mistake: Skipping the right crimper
- Lesson: Use a ratcheting crimper sized for the connector. Cheap pliers give uneven crimps and heat.
-
Mistake: Under- or over-stripping wire
- Lesson: Strip exactly the length required. Too little prevents full contact. Too much exposes wire to the elements.
-
Mistake: Overheating heat-shrink
- Lesson: Heat gently and evenly. Overheating can melt insulation or crack adhesives.
-
Mistake: Not testing under load
- Lesson: Always test the finished splice with expected load. Cold tests miss high-resistance joints that heat up under current.
These simple fixes will reduce callbacks and improve safety on every job. This waterproof wire connector installation guide is based on these real lessons.
Related concepts and use cases
This waterproof wire connector installation guide applies to many situations. Here are common uses and tips.
-
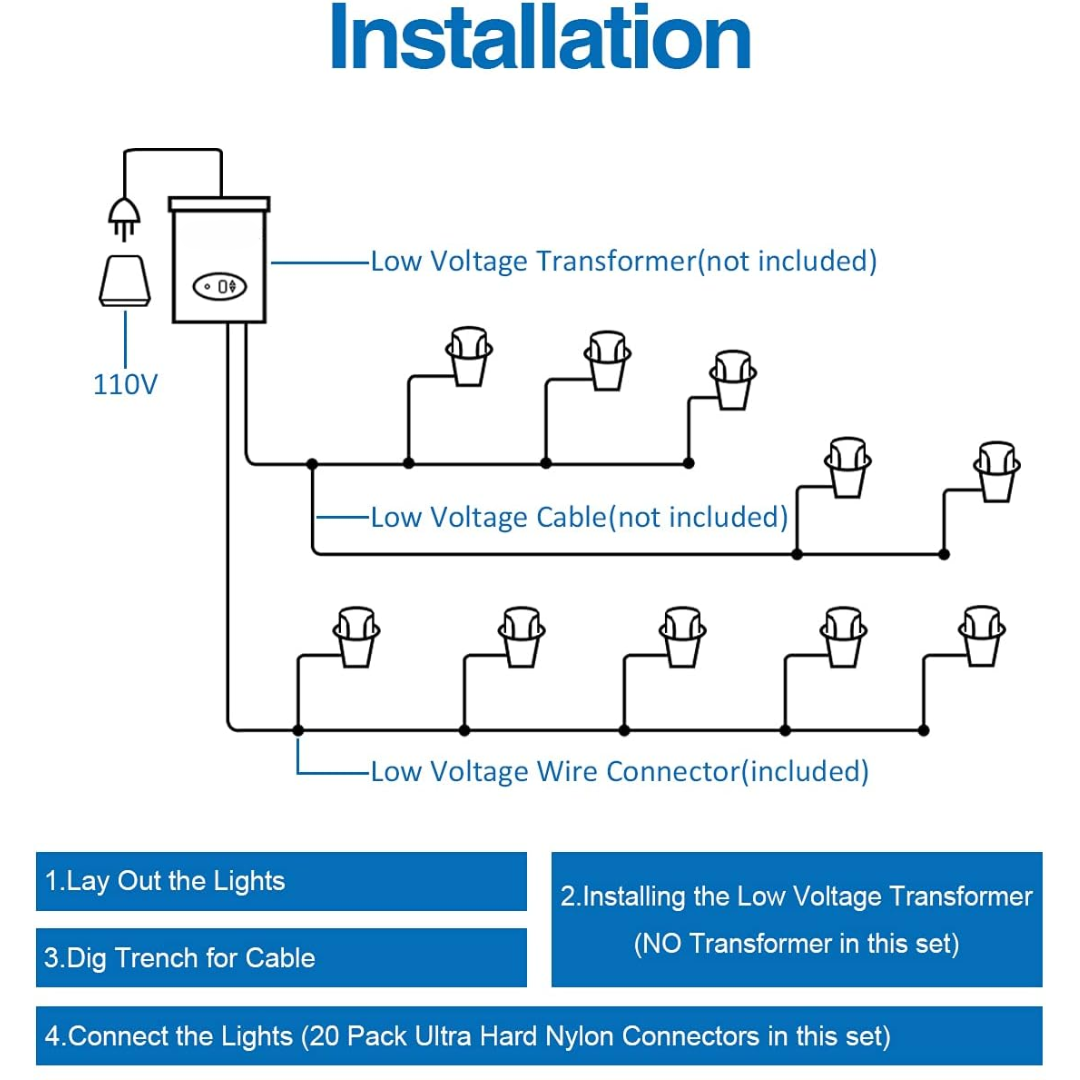
Outdoor lighting and landscape wiring
- Use gel-filled or heat-shrink connectors rated for sunlight.
-
Marine and boat wiring
- Pick connectors tested for saltwater and vibration.
-
Underground splices
- Use buried-rated connectors and extra sealing with resin.
-
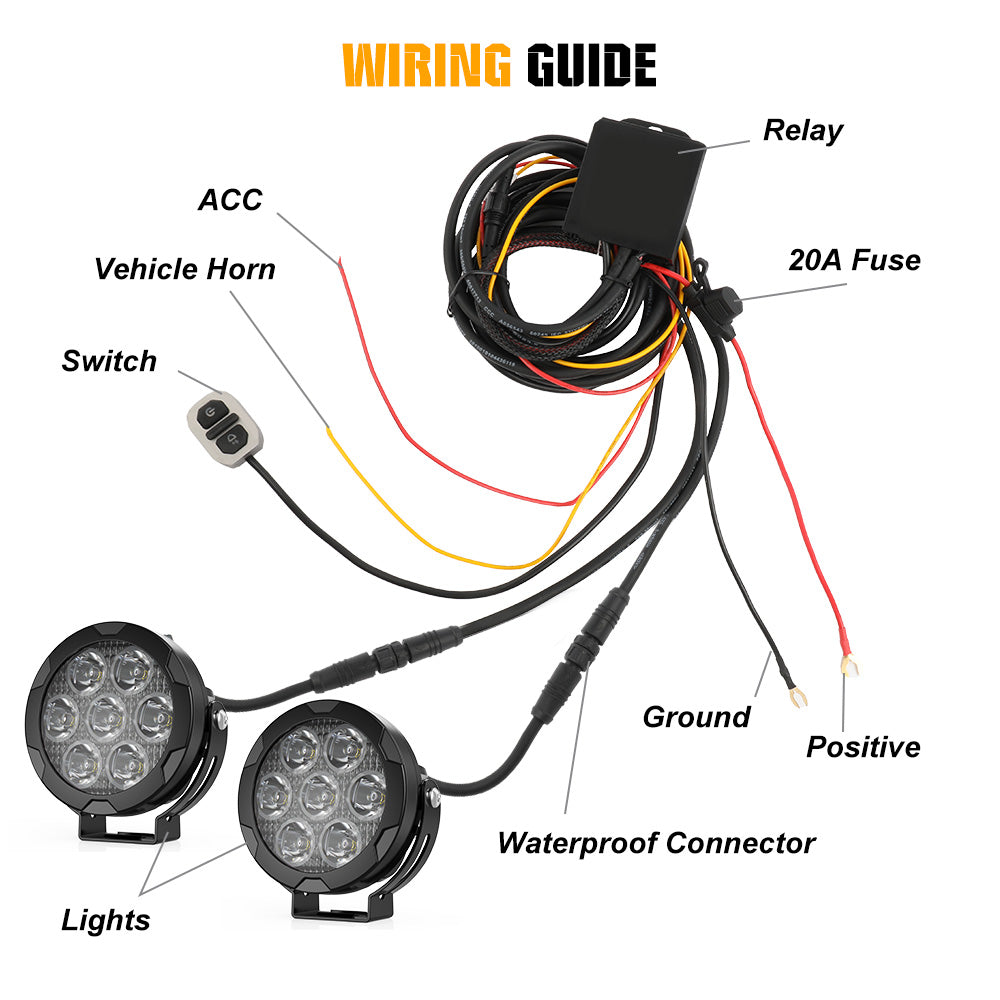
Automotive and off-road
- Choose flexible connectors that handle vibration and temp swings.
These cases show why the right connector and method matter. Match the connector to the environment for long life.
Frequently Asked Questions of waterproof wire connector installation guide
What wire gauges do waterproof connectors cover?
Most waterproof wire connector installation guide options cover common gauges from 22 AWG to 8 AWG. Always check the connector label for its exact range.
Can I reuse waterproof connectors?
Some screw-tight and bolt-style connectors are reusable, but crimped or heat-shrink connectors are typically single-use. Reusing crimp connectors can cause poor contact.
Is heat-shrink enough for marine use?
Adhesive-lined heat-shrink is often enough for marine use if it is rated for saltwater and UV exposure. Combine with dielectric grease for extra protection.
How long do waterproof splices last?
A well-made waterproof splice can last decades in mild conditions. Life span drops with UV, salt, or mechanical stress without proper protection.
Do I need professional help for high-voltage splices?
Yes. For high-voltage or mains work, hire a licensed electrician. This waterproof wire connector installation guide is best for low-voltage and general-purpose splices.
Conclusion
This waterproof wire connector installation guide gives clear steps, tool lists, and real-world tips to make reliable outdoor splices. Practice the steps, use the right connector, and test under load to avoid failures. Take action: gather the right tools, try a small splice using this guide, and share your results or questions below to learn faster.