Replace the RV water heater thermostat by cutting power, removing the cover, swapping the part, and testing carefully.
I’ve replaced dozens of RV water heater thermostats over the years, so I’ll walk you through a clear, safe, and practical process for how to replace rv water heater thermostat. This guide covers why you might need a new thermostat, the tools and parts to get, step-by-step instructions, troubleshooting tips, and real-world lessons I learned on the road. Read on to save time, avoid common mistakes, and get your hot water back quickly.

Why replace the thermostat on an RV water heater?
A failing thermostat often causes no hot water, inconsistent water temperature, or a heater that never shuts off. Replacing a faulty thermostat is usually cheaper and faster than swapping the entire water heater unit. Knowing how to replace rv water heater thermostat helps you keep your rig comfortable and reduces service bills. I’ll also explain how to spot related issues so you don’t replace the wrong part.

Safety first: what to know before you start
Safety matters. Work on water heaters involves electricity and sometimes gas. Always follow safety steps and turn off power and fuel sources. If you are unsure about electrical wiring or gas lines, hire a certified RV technician.
- Turn off the shore power and remove battery power. Leave the unit de-energized.
- Shut off propane and close the gas valve for gas water heaters.
- Drain the water heater and relieve pressure by opening a hot faucet.
- Use gloves and eye protection. Hot water or steam can cause injury.
- Photograph wiring and label wires before disconnecting them to avoid mistakes.
Learning how to replace rv water heater thermostat is simpler when safety comes first.
Tools and replacement parts you’ll need
Get the right tools and parts before you begin. A correct thermostat model is crucial; note make and model of your RV water heater.
- Socket set and screwdrivers for access panels and fasteners.
- Multimeter to test voltage and thermostat continuity.
- Replacement thermostat made for your heater model.
- Non-contact voltage tester for extra safety.
- Teflon tape or pipe joint compound if you remove plumbing fittings.
- Small brush and rag to clean the area before reassembly.
- Owner’s manual or model number from the heater’s data plate.
Buying the right thermostat is one of the most important steps in how to replace rv water heater thermostat correctly.

Step-by-step: how to replace rv water heater thermostat
Follow these numbered steps. Read them all first, then perform them calmly and methodically.
- Turn off power and fuel. Disconnect shore power and battery. Close propane if applicable.
- Drain the tank. Open a hot water tap and the pressure relief valve to remove water pressure. Place a bucket under any drain plug.
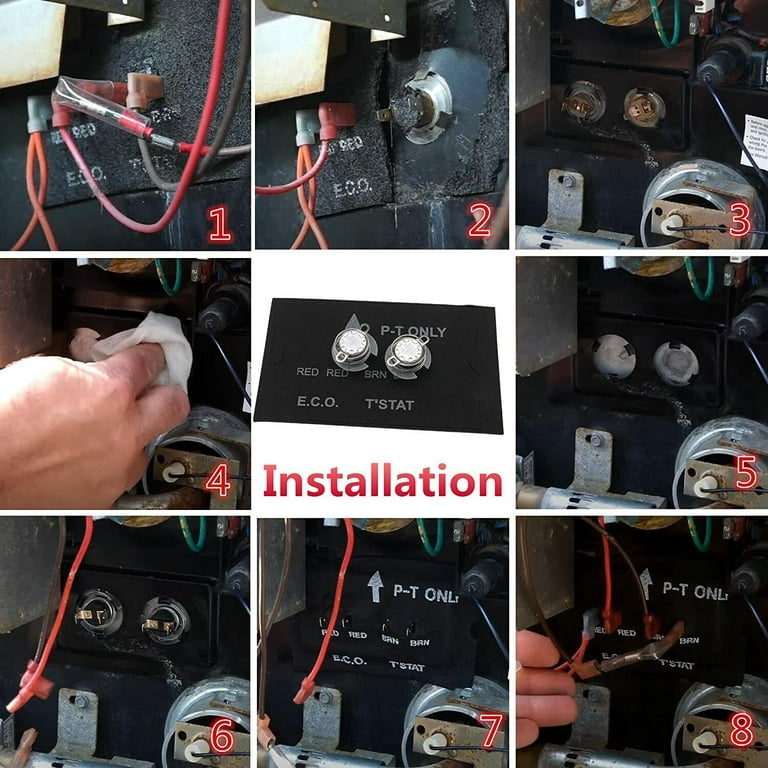
- Access the thermostat. Remove the outer access panel and insulation to reveal the thermostat and heating element area.
- Photograph and label wires. Take clear photos of each wire and terminal. Use labels or tape to mark connections.
- Test for power. Use a non-contact tester and multimeter to confirm no live voltage at the thermostat or element.
- Remove wiring and mounting. Loosen terminal screws and remove the mounting screws or bolts that hold the thermostat.
- Remove the thermostat. Pull the thermostat straight out. If it’s stuck, use gentle rocking while pulling to avoid damage.
- Install the new thermostat. Slide in the replacement, align mounting points, and fasten securely. Ensure proper seating.
- Reconnect wiring. Reattach wires to the same terminals you documented. Tighten screws firmly but don’t over-torque.
- Reassemble and test. Replace insulation and the access panel. Restore power and fuel. Run the heater and verify hot water and proper thermostat operation.
Be cautious and deliberate when learning how to replace rv water heater thermostat. A careful swap will avoid leaks and electrical faults.

Troubleshooting after replacement
If the heater still misbehaves, check a few common causes.
- No power at the heater: Verify shore power, breakers, and fuses first.
- Thermostat mismatch: Confirm the new thermostat matches voltage and type of the original.
- Heating element or gas valve issue: A bad element or defective gas control can mimic thermostat failure.
- Loose wiring: Recheck terminal tightness and wire placement against your photos.
- Pilot or ignition problems for gas units: Ensure pilot lights and igniters work correctly.
When troubleshooting how to replace rv water heater thermostat, a multimeter is your best friend for confirming continuity and voltage.

Maintenance tips to extend heater life
Routine care prevents many thermostat and heater problems.
- Flush the water heater annually to remove sediment that stresses the thermostat and elements.
- Check anode rods and replace when corroded to protect the tank interior.
- Inspect exterior panels and vents for debris and damage.
- Test thermostats and heating elements seasonally before long trips.
- Keep a small repair kit with spare fuses, a basic thermostat compatible with your model, and tools.
These maintenance steps help reduce the frequency you'll need to replace the thermostat and teach you more about how to replace rv water heater thermostat when the time comes.

Time, cost, and when to call a pro
A DIY thermostat swap takes about 30–90 minutes for most models. Parts cost ranges from $20 to $120 depending on the thermostat and model. If you encounter damaged wiring, a leaking tank, or you’re uncomfortable with electrical or gas components, call a pro.
- Quick DIY: Simple electric models can be fast jobs.
- Complex cases: Gas systems with faulty valves or tanks need certified service.
- Safety-first: If you are in doubt, pay for expert work to avoid hazards.
Knowing when to call an expert is a key part of learning how to replace rv water heater thermostat responsibly.

Quick questions many RVers ask (PAA-style)
Can I replace an RV water heater thermostat myself?
Yes, if you are comfortable with basic electrical work and follow safety steps. Turn off all power and document wiring before starting.
How long does a thermostat replacement take?
Expect 30 to 90 minutes for most electric thermostats. Gas models can take longer if pilots or gas lines need attention.
Will replacing the thermostat fix no hot water?
It will fix many cases caused by a bad thermostat, but not issues from a failed heating element, blocked gas flow, or an empty tank. Test components before replacing parts.

Frequently Asked Questions of how to replace rv water heater thermostat
What are the signs a thermostat on my RV water heater is bad?
A bad thermostat often causes no hot water, uneven temperature, or a heater that runs continuously. A multimeter test for continuity when the unit is off confirms failure.
How do I find the correct replacement thermostat for my RV heater?
Check the heater’s model number on the data plate and match voltage and mounting style. Bring the old thermostat to a parts store or look up model-specific parts online.
Do I need to drain the tank to replace the thermostat?
Yes. Draining or relieving the tank pressure prevents hot water from spraying when you open access panels. Always follow the manufacturer’s drain procedure.
Can I use any thermostat for an RV water heater?
No. Use a thermostat that matches the heater’s voltage, type, and mounting. Using the wrong part can cause malfunction or damage.
Is it safe to replace the thermostat if I have a gas water heater?
You can replace the electrical thermostat on many gas units safely with power off and propane shut. If you must touch gas valves or lines, hire a certified technician.
How do I test the new thermostat after installation?
Restore power and run hot water until the heater cycles. Use a multimeter to check voltage at the thermostat terminals and verify continuity when the thermostat is calling for heat.
What mistakes should I avoid when replacing the thermostat?
Avoid working with live power, skipping photos of wiring, using the wrong replacement part, and failing to check for leaks or loose terminals after installation.
Conclusion
Replacing an RV water heater thermostat is a clear, fixable task if you follow safety steps and use the right parts. Start by powering down, documenting wiring, and testing before and after the swap. If you stay careful, you can restore hot water quickly and save on service costs. Try one small DIY job today, or bookmark this guide for your next RV repair. Leave a comment with your make and model if you want tailored steps or troubleshooting help.